By Susan | Wild Yeast
Here’s what we did six or seven weeks ago: We raised bread with sourdough starters made from several ancient grains: amaranth, sorghum, quinoa, millet, and teff.
My favorite of these was teff. It’s best known for the Ethiopian staple flatbreadinjera, but it makes a wonderful addition to loaf breads as well (although it contains little or no gluten, so a 100%-teff bread would require some of that gluten-free expertise that I don’t have yet). I’ve heard the flavor variously described as chocolate-y coffee-y, nutty, earthy. You could just call it tasty and leave it at that. And it imparts a lovely reddish crust color in the bargain.

So, enamored of this tasty and cute grain (Did I say cute? Well, yes, I think any grain whose diameter is less than 1 mm qualifies as cute, don’t you?), I was inspired to give it a whirl in my own kitchen. I picked up a 1.5-pound bag of teff flour for about $7. Add expensive to teff’s personality profile.
My first attempt was a teff sourdough. I took a portion of my starter, fed it with teff flour for a few days and proceeded to mix up a simple bread dough with it. The dough was too dry. I added water. It was still too dry. I added more water. It was the perfect consistency. Then in the next breath, it was soup.
This was when I remembered that teff is not only cute and tasty and expensive, buttemperamental. It drinks and drinks up water, and suddenly lets it go (kind of like having an infant in the house again). I decided to try to work with the soup; this was a bad idea. I wound up with flat boards that could serve as cricket bats in a pinch:
I’ll do teff sourdough again some day, but in the meantime I took another tack — with a teff poolish this time. This was also one we had made in class. Determined not to overhydrate again, I held back quite a bit of water (more than I usually do) when mixing the final dough — and realized as I was cleaning up that I had not added any of it back in. I weighed it and it turned out to be a whopping 70 grams — about 10% of the total water in the formula. So instead of 68% hydration, this one came in at about 62%. On paper, practically a bagel.
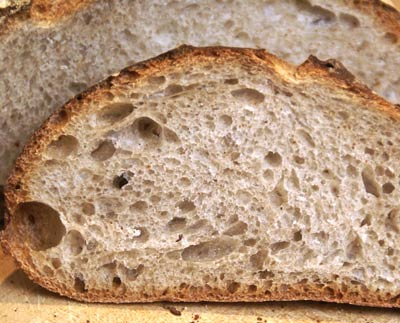
And yet, the crumb was not super dense and dry. Not the most open I’ve ever done, for sure, but not terrible either. Go figure.

My final analysis: teff is tasty, cute, expensive, temperamental, and enigmatic. Now I dare you to try it.
This enigmatic bread goes to IDania (El Aroma de IDania) and Zorra (1x umrühren bitte) for BreadBakingDay #24, Mixed Breads, along with my appreciation for creating and hosting this wonderful monthly event.
Teff Poolish Bread
(adapted from SFBI)
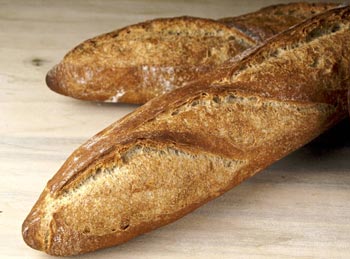
Yield: 1930 – 2000 g. I made two baguettes and two boules with my 1930 g of dough.
Time:
- Ferment teff poolish: 12 hours
- Mix final dough: 10 minutes
- First fermentation : 1.5 hours with a fold, if needed, at 45 minutes
- Preshape, rest, and shape: 30 minutes
- Proof: 45 minutes – 1.25 hours
- Bake: 20 minutes or more (depending on size and shape of loaves)
Desired dough temperature: 75F
Teff Poolish Ingredients:
- 273 g flour
- 82 g teff flour
- 355 g water
- 0.4 g (1/8 t.) instant yeast
Final Dough Ingredients:
- 818 g flour
- 373 – 443 g water (I used the smaller amount; the original formula calls for the larger. You figure it out.)
- 6.7 g (2-1/8 t.) instant yeast
- 23.5 g (scant 4 t.) salt
- All of the teff poolish
Method:
- In a bowl, combine the poolish ingredients. Cover and ferment for 12 hours at room temperature.
- In the bowl of a stand mixer with a dough hook, combine all of the final dough ingredients. Mix on low speed until incorporated.
- Continue mixing in low or medium speed to a medium level of gluten development.
- Transfer the dough to a lightly oiled container. Cover and ferment for 1.5 hours, with a fold after the first 45 minutes if the dough seems very slack.
- Turn the dough into a lightly floured counter. Divide into 250 – 350 g for baguettes, 500 – 700 g for boules or batards. Preshape into cylinders (for baguettes) or balls and let rest, covered, for 20 minutes.
- Shape the dough into its final shapes and place it, seam-side-up, on a very well-floured couche or linen-lined baskets.
- Proof, covered, for 45 minutes or longer, until the indentation left by a fingertip springs back very slowly. Baguettes will take less time to proof than boules or batards, so bake them first.
- Meanwhile, preheat the oven, with baking stone, to 475F. You will also needsteam during the initial phase of baking, so prepare for this now.
- Just before baking, slash the loaves as you like.
- Once the loaves are in the oven, reduce the temperature to 450. Bake for 8 minutes with steam, and another 12 – 25 minutes or so without steam. Then turn off the oven and leave the loaves in for another 5 – 10 minutes, with the door ajar.
- Cool on a wire rack.
(Susan is currently a student in the professional bread and pastry program at SFBI)